Inspired by Pancake and Burger by Philipp Stollenmayer, I want to make and release a simple but well crafted iOS game in 100 hours.
The 100 hour deadline is part business—as this is unlikely to make any money, I probably shouldn’t spend that much time on it—and part creative—having a time constraint will force me to make faster decisions and to not second guess them.
Fastlane is mostly pretty great, automating much of the drudgery around releasing apps, but there are issues with Xcode’s UI testing where the simulator will fail to launch with UI Testing Failure - Timeout waiting to launch Target Application. or UI Testing Failure - App state is still not terminated. errors, especially with a large number of UI Tests (Trail Wallet has over 35).
This means that one of the big ticket items of Fastlane, Snapshot, is unreliable with my full test suite. However, I didn’t want to give up on it because the idea of having a process that automatically takes and uploads screenshots to iTunesConnect for all devices across multiple locales based on the current version of the app was just too good to leave behind.
In the end, in order to get reliable results, I ended up duplicating my main scheme and simply removing all other UI Tests, leaving only tests specifically designed for Snapshot. It’s defiling the sanctity of my tests to have tests specifically to take screenshots, of course, but the potential time saving benefits are well worth it and, hopefully, it’s only temporary.
Here’s how I did it:
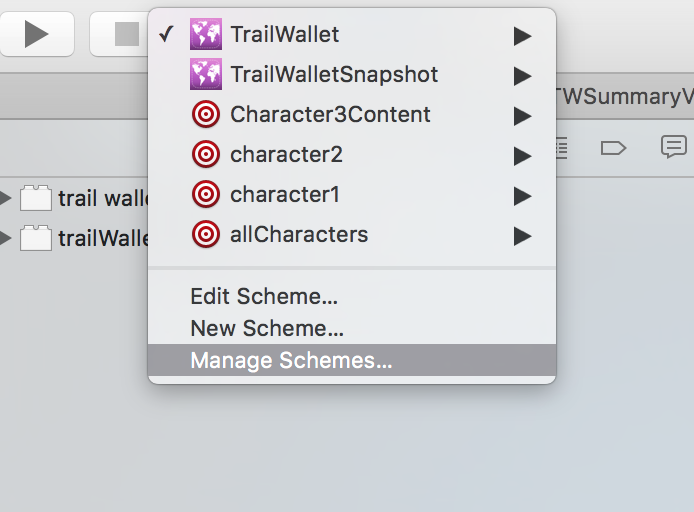
1. Click the app icon to get access to the Scheme menu, then click ‘Manage schemes…’
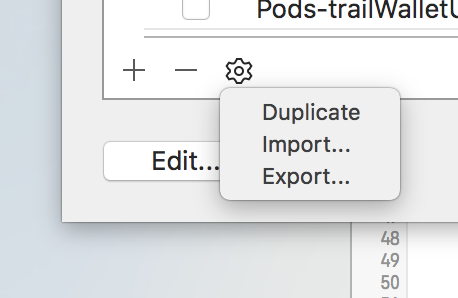
2. Select your main app scheme, then down in the bottom left click the gear icon and click “Duplicate”
3. Rename your scheme (e.g. <AppName>Snapshot) then click “Edit…”
4. Click on `Test` in the left hand list, then click the disclosure indicator next to your UI Tests target and deselect everything except your snapshot tests.
5. Finally, (assuming Fastlane is set up in your application folder) edit your Snapfile at `[AppDir]/fastlane/Snapfile` and set the scheme to your newly created scheme:
# A list of devices you want to take the screenshots from
 devices([
   "iPhone 6",
    "iPhone 6 Plus",
   "iPhone 5",
    "iPhone 4s",
    "iPad Air"
])

languages([
  "en-US"
])

# The name of the scheme which contains the UI Tests
scheme "TrailWalletSnapshot"
Snapshot will use this new scheme and only run the relevant tests.
It’s not ideal, as having Snapshot run through every test and verify they pass on every device before uploading a build is good practice, but given the unreliable nature of the simulator for me at the moment this at least gets me some of the benefits of using Snapshot.
I have had modules switched off in Xcode for Trail Wallet since its introduction. I have a Core Data entity called “Category” and, when I tried to enable the modules feature (introduced in Xcode 5), I was hit with Redefinition of 'Category' as a different kind of symbol error.
Recently, however, things came to a head when I tried to import a mixed-source framework into Trail Wallet and it refused to see the Swift files.
The solution to getting Swift files in external frameworks to work in Objective-C projects, according to Apple’s Using Swift with Cocoa and Objective-C, is to import it as a module within Objective-C (e.g. @import ExternalFramework;).
So I assumed I was finally going to have to tackle entity renaming, which is handled by Core Data’s lightweight migration but only if it is set up correctly.
I generally dislike database migrations and try to avoid doing them if I can. I’ve never had an issue with a production version and migration (probably because I’m so paranoid about it), but it’s always nerve-wracking when a new version with a migration goes out into the world.
Previous searches had yielded no good news but I thought I should search one last time, which revealed this answer at Stack Overflow—I could avoid a migration after all.
The SO answer is a little light on details, so here are the exact steps I took:
1. Select the .xcdatamodeld file, then select the entity that’s causing the conflict (Category, in my case)
2. Select the Data Model inspector in the Utilities pane.
3. Rename the Class property:
4. Re-generate the NSManagedObject subclasses by going to Editor -> Create NSManagedObject Subclass....
Xcode 7’s NSManagedObject subclasses work a little differently than they used to—it generates its own category that it is then free to overwrite should you change the entity in future versions, and leaves the core class for you to add additional methods and properties to.
5. If you have added additional functionality to the NSManagedObject subclasses, you’ll need to copy it across.
I had a category on my Category entity (of course I did) called Category+GetCategories.[h/m], so I had to copy out all of the API and implementation from these files and put it all in the newly generated CDCategory.[h/m] files.
6. Delete the old classes.
7. Update all references to the old class and replace them with the new class, in my case I had to replace Category and with CDCategory throughout the project.
It all worked just fine, no database migration or entity renaming required.
The only other gotcha was that, after attempting to run with the new framework, it was crashing out with a dyld: Library not loaded: @rpath/libswiftCore.dylib error.
This is caused by the build setting Embedded Content Contains Swift Code being set to No. Switching this to Yes allowed the project to run and use the Swift code in the framework.
I’ve been working a lot with CALayers over the past few days, specifically layers with circular shapes, and so these two little extensions have been really useful.
The first is your standard degrees to radians conversion function that every programmer that’s worked with UI has probably written at some point.
The second is a bit more interesting, though, as it finds a point on a circle within a frame of a given size (it also assumes that 0 is the top of the circle, not the right edge as in Core Animation):
let rectForCircle = CGRect(x: 0, y: 0, width: 50, height: 50 )
let point = CGFloat(90).positionOnCircleInRect(rectForCircle)

// Returns x 50, y 25—or the point at 90º on a circle
Managing App IDs and provisioning profiles has come on a lot from when I first started iOS development almost three years ago. Xcode now does a fair amount of the heavy lifting for you, creating App IDs and development provisioning profiles automatically as and when they’re needed. This is great, removing some of the administrative burden and getting new projects running on devices as quickly as possible.
It has become so easy, in fact, that I thought I could just start submitting apps to the App store for testing based on simply setting the Team setting in the General tab of the target in Xcode. There was nothing really telling me that I couldn’t do this—this process will work just fine until you want some advanced entitlements (like iCloud), at which point trying to upload it to iTunes will result in no matching provisioning profiles found for application errors.
When I looked carefully at the error, I noticed that it was trying to use the wildcard provisioning profile which isn’t allowed when it comes to certain entitlements.
After much deleting of the automatically generated App IDs and provisioning profiles, I realised that you still needed to manually create a distribution profile with your distribution certificate even though the Code Signing Entities in the Build Settings tab now always just say iOS Developer now and the Provisioning Profile says automatic. There are few clues that multiple provisioning profiles were even necessary any more.
Anyway, it’s my fault for making the assumption that differentiated provisioning profiles were a thing of the past—I thought I had reached the point of never needing to reach for the Certificates, Identifiers & Profiles section of the Developer Portal again—but maybe this will help someone else come to the realisation sooner that, when it comes to distribution profiles, you always need to make sure you have one set up and you have to do this manually.
I’m currently creating an app that uses some weird formatting and inline images that can be handled nicely by NSAttributedString.
The app is bundled with a pre-populated database and I was considering populating the database with the already formatted strings and images.
Core Data supports NSAttributedStrings—just set the attribute to be Transformable and you can create and store attributed strings along with most attributes.
The interesting thing is that it can also store images within the strings if you add it using NSTextAttachment:
let attributedString = NSMutableAttributedString(string: "Hello images!")
var attributes: [String : AnyObject]?

if let font = UIFont(name: "AvenirNextCondensed-Medium", size: 30) {
    attributes = [ NSFontAttributeName : font ]
}

let range = NSRange(location: 0, length: attributedString.length)
attributedString.setAttributes(attributes, range:range )

// You can safely pass nil to both parameters if using an image
let textAttachment = NSTextAttachment(data: nil, ofType: nil)
textAttachment.image = UIImage(named: "TestImage")
let imageString = NSAttributedString(attachment: textAttachment)
attributedString.appendAttributedString(imageString)

coreDataEntity.transformableAttribute = attributedString
There’s a few issues with this:
Your database will get big fast. Unlike the Binary attribute, there’s no way to tell Core Data to use external storage.
You’re passing in the scale of image of the device that created the image. For example, if you’re running the app on an iPhone 6, then UIImage(named:) will return an @2x image and this and only this scale is what will be stored in the database
This will be fine if it’s going to be accessed on the same device that it’s created on, but if you use any sort of syncing or you want to deliver a pre-populated database in your app bundle, then you’re going to be passing around an image that might be the wrong scale for the device.
Also, storing attributed strings this way breaks any connection with dynamic text styles, so there’s no resizing of the string after it comes out of the database if the user changes the text size in Accessibility. This makes sense as the font is hardcoded into the attributed string so there’s no way of the system knowing that it should resize it, but it does make storing attributed strings in the database less useful if you want to provide dynamic text resizing (which you should).
Because of these limitations, I think I’m going to stick with formatting the strings and adding the image on the fly for the moment, but it’s good to know what’s possible with Core Data.
Drew this on an iPad in Sketchbook Pro while waiting at the Airport. This is the second incident of Robots fighting Tentacles—the first was all the way back in 2011.