This is part 2 of my attempt to document the process of creating a simple jigsaw puzzle game in excruciating detail.
To create the puzzle images, I want to be able to take a Photoshop document, slice it up using the selection tools, then export those sliced-up layers. I also want to use a script to automatically generate the final, correct locations for all of the pieces and write them to a JSON file that will work on all devices.
In order to do that, there needs to be consistency between the Photoshop document size and the game scene size.
Understanding Scaling Modes
Unfortunately, I am not dealing with a single device size. Here are the pixel dimensions, point sizes, scale factor, and aspect ratios of different iOS devices in the landscape orientation:
| Device | Pixels | Points | Scale | Aspect Ratio |
|---|---|---|---|---|
| iPhone X | 2436 x 1125 | 812 x 375 | @3x | 19.5:9 |
| iPhone 8 Plus | 1920 x 1080 | 640 x 360 | @3x | 16.9 |
| iPhone 8 | 1334 x 750 | 667 x 375 | @2x | 16:9 |
| iPad Pro 12.9 | 2732 x 2048 | 1366 x 1024 | @2x | 4:3 |
| iPad 9.7" | 2048 x 1536 | 1024 x 768 | @2x | 4:3 |
For many game types, the easiest way to maintain gameplay consistency across devices is to hard code one (all devices) or two (iPad and iPhone) sizes when setting up the scene. I’ll start with one:
let scene = GameScene(size: CGSize(width: 4438, height: 2048))
I then need to define what happens if that scene size does not correspond exactly to the device window size.
This is done by setting the scaleMode property on the scene:
let scene = GameScene(size: CGSize(width: 4438, height: 2048))
scene.scaleMode = .aspectFill
The two most useful of these modes are aspectFit and aspectFill. Both of them ensure that assets are not squashed or stretched in any way.
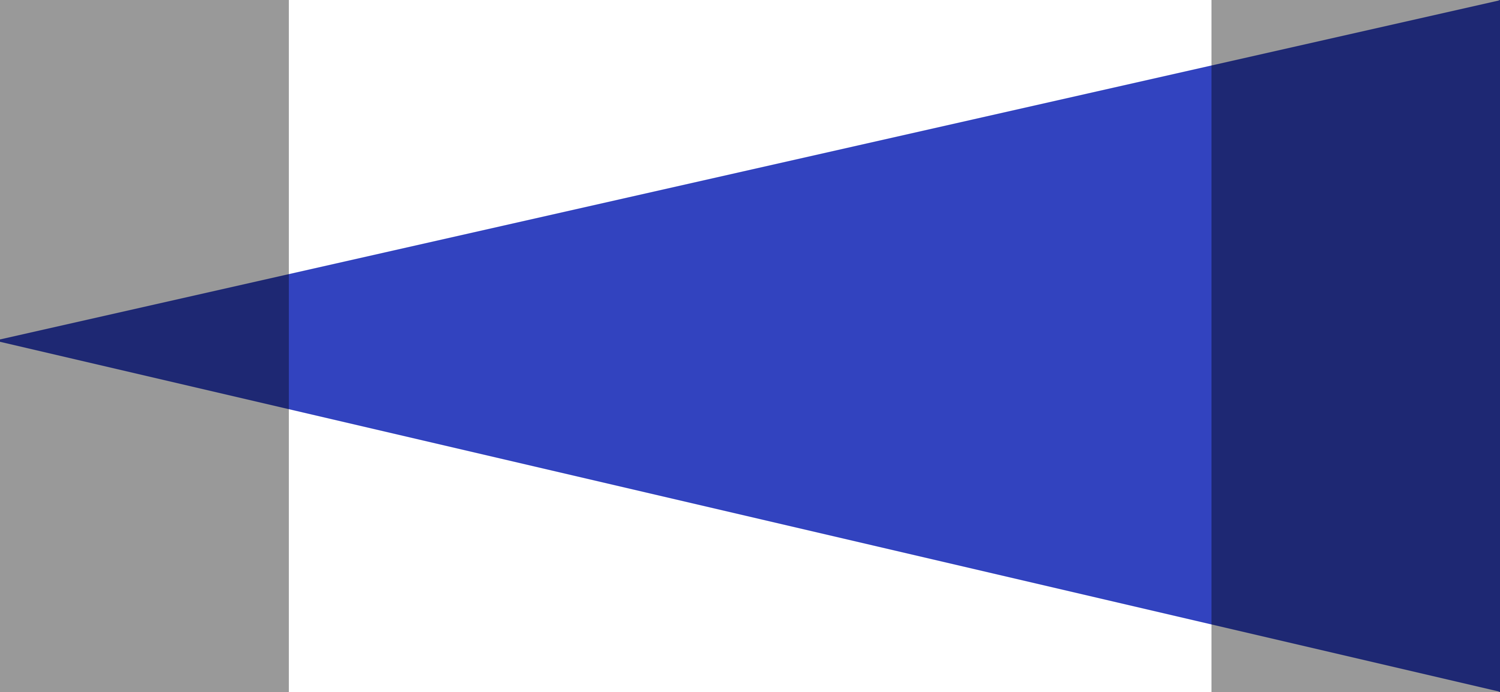
aspectFit scales down the scene so that the whole thing appears on screen at once, even if that means creating horizontal or vertical bars:
aspectFill scales the scene so that there are no horizontal or vertical bars, even if that means clipping the content.

I don’t want to see any black borders, so I’m using aspectFill. This will result in the content being clipped on all devices except the iPhone X.
Why is this? Because, in the above example, although the scene size is not the same as the X’s window size (4438 x 2048 vs 2436 x 1125), it is the same aspect ratio (19.5:9). It will be scaled down to approximately 55% of its original size but, unlike all the other devices, it will all fit.
Choosing a scene size is all about where I want the dead content areas to be. These areas will only be seen on some devices and so can’t contain any game-critical content.
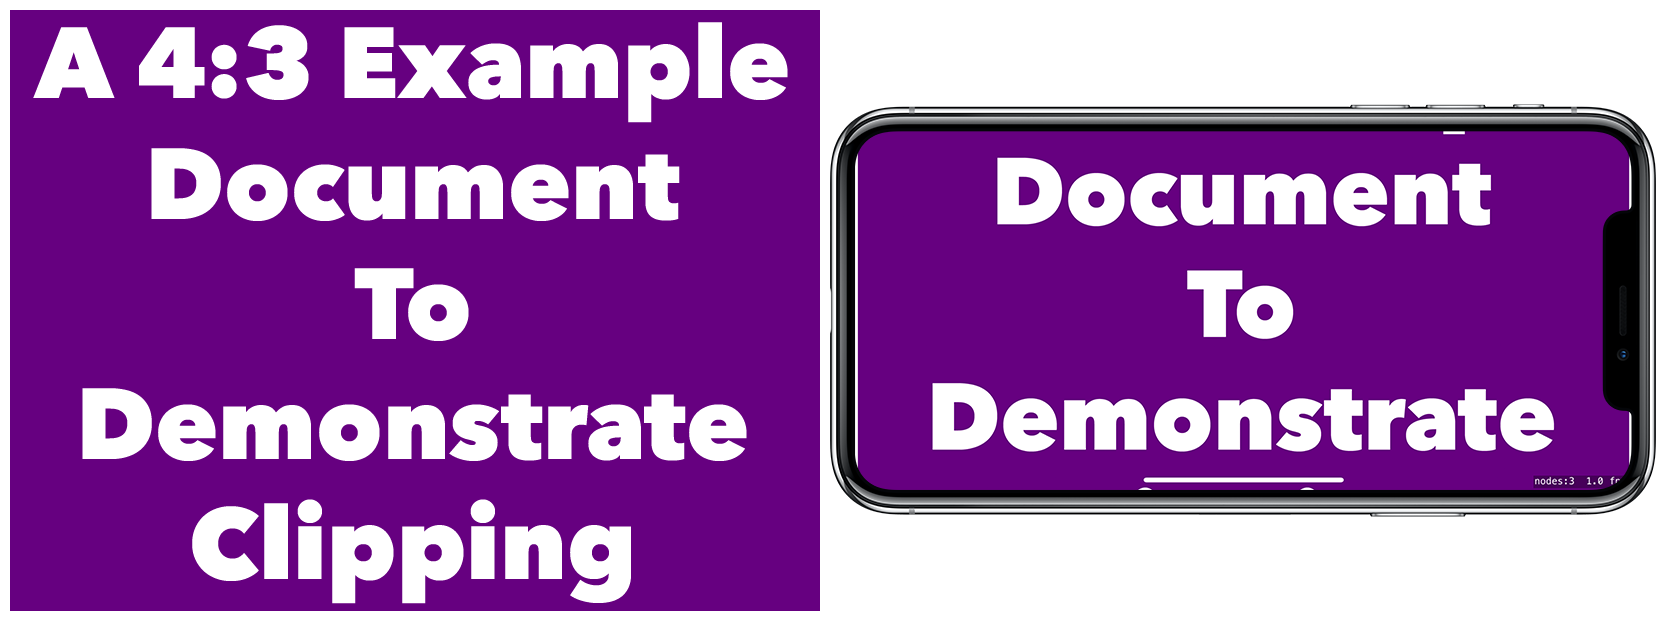
Using a 4:3 Document and setting the GameScene to be 2732×2048, the top and bottom of the areas will be clipped like this on the iPhone:
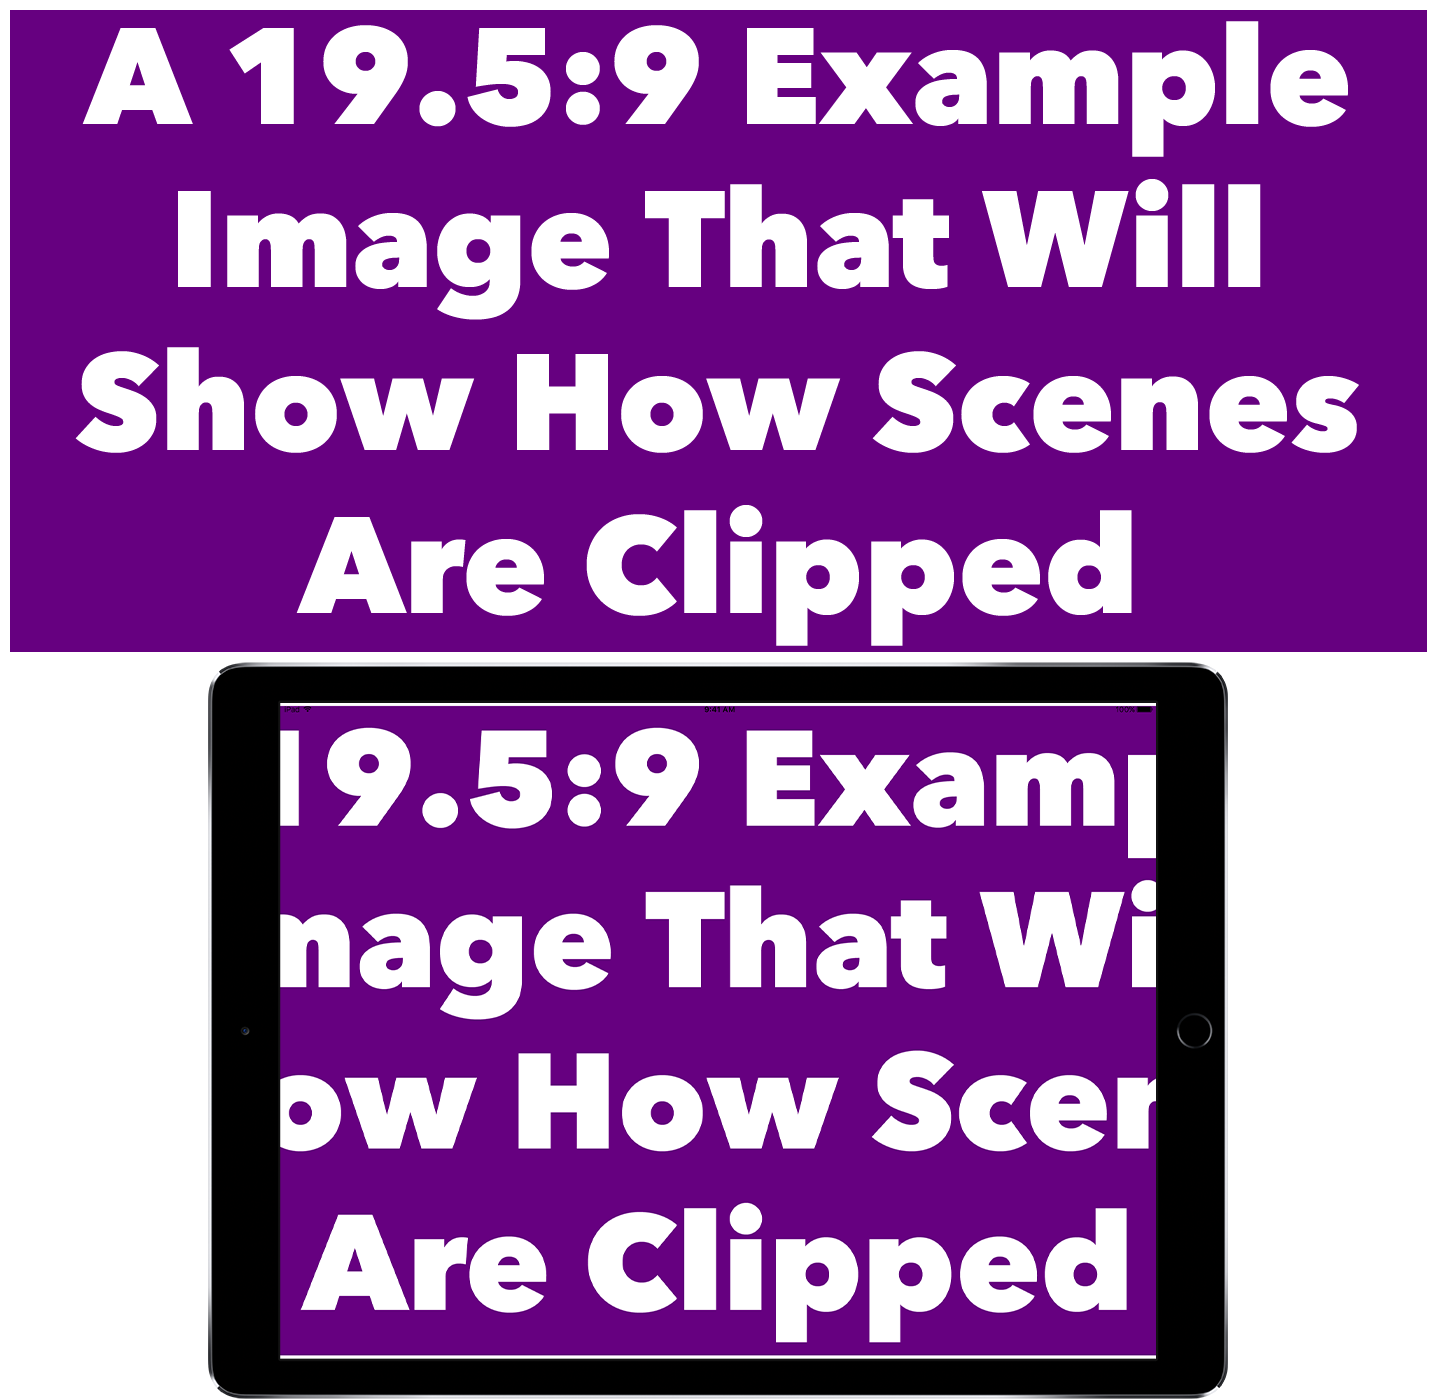
Whereas using a 19.5:9 Document and setting the GameScene to match (4438×2048), the left and right areas will be clipped like this on the iPad:
Given where people’s thumbs tend to be when holding an iPhone in landscape, I would rather have the additional dead content appear on the iPhone than have it appear on the iPad. My Photoshop document should therefore have an aspect ratio of 19.5:9.
Choosing the Document Size
The actual size of the Photoshop document and the game scene depend on whether or not I’m dealing with vector or raster images.
Vector images are resolution independent and it’s better to create these at the smallest possible size and scale up (see below).
Raster images are resolution dependent, which means scaling up will degrade the quality of the image so it makes more sense to create these at the highest possible resolution and scale down.
The example above assumes I’m using a raster image.
Creating The Pieces from a Vector-Based Document
Marc Edwards has an excellent blog at Bjango full of great asset design advice and his recommendation has always been to design at 1x using vector tools and scalable effects, then create the scaled up versions for different devices on export.
The main reason for this is that it prevents blurry lines and maintains the sharpness of the design.
A 1px line at 3x (e.g. for the iPhone X) will become 0.66666px line at 2x (for the iPhone 8), whereas a 1px line at 1x will scale up nicely into a 2px line at 2x and 3px at 3x. This will ensure it remains flush with the pixel boundaries and will keep it crisp at all sizes.
If I was to create a vector image for my puzzle game, I should therefore base the document on the point sizes in the device table at the top, not the pixel sizes.
The iPad Pro has the largest area in terms of point size (1366 x 1024). However, this is an aspect ration of 4:3 and I need 19.5:9.
As the vertical size will be the same for both the 4:3 and 19.5:9 ratios, I divide this by 9 and multiply it by 19.5 to get the new horizontal width.
( 1024 / 9 ) * 19.5 = 2218.66666
My final document size needs to be 2219 x 1024.
However, I have to remember that only the centre part of this document will be viewable on the iPad, so it’s worth marking out the 1366 width around the centre:
Finally, the game scene will need to match the point size of the document:
let scene = GameScene(size: CGSize(width: 2219, height: 1024))
scene.scaleMode = .aspectFill
Optimising for iPhone with a Vector-Based Document
Working at this size is not ideal for performance on the smaller devices. Generating a sprite from this document that is, for example, 1/4 of the working area comes out as 683 x 512 points, which is larger than the iPhone 8’s entire screen!
SpriteKit will have to load it all into memory, then scale it down by over 50%, which is extremely inefficient and may cause dropped frames on older devices.
If I halve the point dimensions of this document, I get a new size of 1109 x 512. This will allow me to generate assets that are more amenable to phones. If I then scale up the assets by 4x, I’ll then also get the correct size for iPad (as this is equivalent to doubling the document size and then creating @2x assets from that).
To review:
2x for iPhone 8
3x for iPhone 8 Plus and iPhone X
4x for iPads (equivalent to creating @2x assets at double the document size)
Photoshop offers Asset Generation, which makes this easy if I adopt the following layer naming convention:
200% puzzle-piece-1@2x.png, 300% puzzle-piece-1@3x.png, 400% puzzle-piece-1@2x~iPad.png
Adding the @2x, @3x, and ~iPad to the names helps Xcode’s asset catalogs to automatically sort the incoming images into the correct buckets. I can export the pieces, select them all in Finder, then drag them into a Sprite Atlas folder within the asset catalog and Xcode will separate and sort them correctly.
Finally, I need to account for the fact that the iPad’s scene is now double the size of the iPhone’s when setting it up:
let scene : GameScene
if UIDevice.current.userInterfaceIdiom == .pad {
	scene = GameScene(size: CGSize(width: 2219, height: 1024))
} else {
	scene = GameScene(size: CGSize(width: 1109, height: 512))
}
scene.scaleMode = .aspectFill
All this makes it possible to use a single vector-based Photoshop document to generate all the assets while still benefiting from increased performance by targeting the iPhone and iPad separately.
Note: although the document is vector-based, the actual assets produced will be raster images.
Creating The Pieces from a Raster-Based Document
If the image is a raster document (e.g. it was painted in Procreate on the iPad and imported into Photoshop, like many of my illustrations are), then I need to take the pixel dimensions of the devices and scale down.
Based the device with the most pixels (the iPad Pro again), the working area of the document will be 2732 x 2048.
I extend it horizontally to get the width of a 19.5:9 document:
(2048 / 9) * 19.5 = 4437.3333333
This gives me the final (rounded up) document size of 4438 x 2048. Again, the GameScene needs to match this:
let scene = GameScene(size: CGSize(width: 4438, height: 2048))
scene.scaleMode = .aspectFill
Optimising for iPhone with a Raster-Based Document
The pixel dimensions of a piece that was a quarter of the size of the working area would give me a sprite that is 1366 x 1024 pixels, which is huge.
To give the phones a fighting chance, probably the best approach is to simply halve the sizes of the assets during generation using the following layer naming convention:
50% puzzle-piece-1.png, puzzle-piece-1~iPad.png
Important: note the lack of @2x and @3x in the file names. I’m dealing strictly in pixels, so these assets will need to be stored in the asset catalog as 1x assets (even if they’re for 2x or 3x devices).
The fact that this is equivalent to halving the document size for iPhones also needs to be taken into account when setting up the scene:
let scene : GameScene
if UIDevice.current.userInterfaceIdiom == .pad {
	scene = GameScene(size: CGSize(width: 4438, height: 2048))
} else {
	scene = GameScene(size: CGSize(width: 2219, height: 1024))
}
scene.scaleMode = .aspectFill
What The What?
All of this insanity is in service of being able to take a single Photoshop document and use it to not only generate assets for different device types, but to script it to automatically create the JSON model data for the cut up puzzle pieces making developing a range of puzzles quick and easy.
This will also help me when it comes to generating assets for my adventure games. I’ll be able to lay out scenes knowing where the clipped areas will be and I can have scripts generate the starting locations for objects and non-player characters automatically.
Finally, it’ll be a useful reference for when I set up my next game (by which time I’ll have no doubt forgotten how all this works—this is not the first time I have written about this topic).
Speaking of scripts, in the next part I’ll dust off my limited and sporadically-used JavaScript skills and attempt to bend Photoshop to my will.